About

9/16/13

Torchlight II Robot Parts Locations

While playing Torchlight II, it can be difficult to complete one side quest: Robot Parts. It may seem a minor quest, but in fact it's the longest quest of the game, spanning over almost the entire game. The Robot is made up of 5 different parts, all located in 5 different areas/quests. When you've collected all the robot parts, a bot shows up, named Trillbot, who will send you on a final Robot quest: to kill the Three Sisters. Once you've done that, go back to Trillbot to collect your Unique Item reward. It's usually always something useful.
Here you will learn where all the Robot Parts are located, so you can collect them all.

Part 1 - Robotic Drum
Quest: Little Lost Ones

  • Take Crow's Pass to The Widow's Veil
  • The Drum will be at either Location A or B
Location A
Location B
Robotic Drum Part

Part 2 - Robotic Arm
Quest: Tower of the Moon

  • In the Ossean Wastes, locate the Tower of the Moon 


Part 3 - Robotic Pipes
Quest: Shadow of the Skara

  • In the Salt Barrens, locate Swarm Point, then locate the Brood Hives (after hitting all the plungers)


Part 4 - Robotic Body
Quest: The Cave-In

  • In The Blightbogs, locate The Abandoned Sawmill
See the little skeleton hanging on the post ?
Click him and all like him to access the robotic body.


Part 5 - Robotic Head
Quest: Cacklespit's Realm

  • In the Sundered Battlefield, locate Cacklespit's Realm
The wood and stones come together to form a path as you approach it.
It spawns in a different place every time.

Part 6 - Assemble Robot, talk to it
Quest: Three Sisters

  • Wait until the Big Robot beside Professor Stoker goes through the door, then talk to Stoker again.
  • Then, talk to Trillbot, next to Professor Stoker
  • In the Sundered Battlefield, locate 3 Sisters

After you kill the three sister, return to Trillbot for unique item reward.


9/5/13

Optimizing your system with a RAM disk and SSD

RAM and SSD disks, how to use them?

Installing an SSD disk in your system is probably the best thing you can do to upgrade your PC, except for installing more memory into a system with rather little of it.

If you have 8 or more gigabytes of memory or more; adding a RAM disk to your system can increase performance quite a lot, as well as decreasing the wear and tear on your SSD(s) and other drives.

In addition to the raw speed of the SSD it self, the RAM disk boosts you another 200-300 megabytes per second, on top of the SSD speedup if you configure Windows and other cache-heavy appsto host it's temporary files on your RAM disk.

Host the RAM-disk image on the SSD for optimal speed when loading and saving the RAM disk on system restart. The RAM disk loads very early in the boot sequence so any apps depending on your file structure on the RAM disk will not have any problems starting up or shutting down.

My setup:

  • 80 GB Intel 320 Series - With Windows 7 x64 installed. User directory not moved.
  • 120 GB Kingston SV300 Series - Installed 2 years after
  • The free version of AMD Radeon RAM Disk. (4 GB limit). This RAM disk is loaded and saved to the second SSD on each boot and shutdown.
  • System memory is a comfy 4x4 GB DDR3 at 1600 MHz, so 16 gigabytes of RAM.
  • A Lexar USB 3.0 stick. Doesn't perform any better than USB1.0! Shame on Lexar!
  • 160 and 320 gigabyte SATA 2.0 disks. These are used for non-system critical applications, like painting and music programs
  • Two 500 GB Hitachi SATA 2.0 disks, 5 Gbps in RAID 0 configuration on onboard Marvell controller. This RAID was my earlier 'fast' drive.

Checklist:

Steps to take assuming you have a pretty full primary SSD, a second SSD to use, and a RAM disk:
The Java control panel shows you where it loads the JRE or JDK from.

Other Programs

This is programs where I have confirmed that you can configure custom paths for one thing or another.
 I will grow a list here of apps that you can re-configure:
  1. WinMerge - Difff temp folders
  2. PSPad - Backup files directory
  3. uTorrent - Torrent files.
  4. VLC - Encoder temporary files
  5. Locate32 - The database file 'files.dbs' database can be moved.
  6. ImgBurn - Log, project files, misc.
  7. SeaMonkey - Cache
  8. 7-Zip - Temp folder
  9. Putty - Log files
  10. GIMP - Temp files
  11. WinRAR - Temp files, also for non-removable drives
  12. Audacity - Temp files

Changing or turning off your Windows swap/page file

You can turn off, move or resize the computer's virtual memory file , aka swap file, aka page file.
If you have enough memory, like me with my 16 GB, you can most often turn it off and never miss it.
This will be a considerable speedup from having your page-file on a regular spinning disk. But, me being a power-user and developer, I have so much going on that the system eventually runs out.

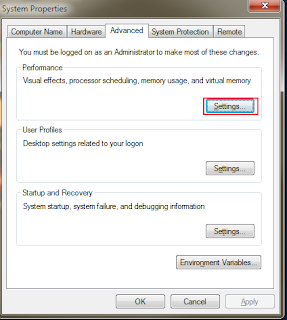
My Computer->Properties and select Settings

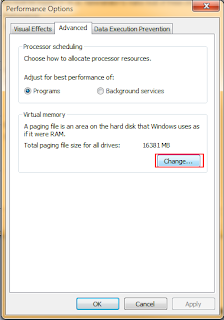
Select 'Advanced' tab and then 'Change'

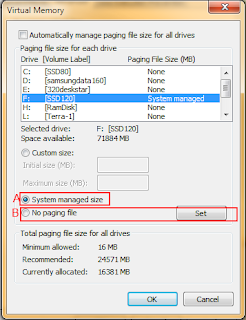
Select the drive you want to edit the page file settings for.
As you can see, you can set it to a custom size or:
Let it be system managed.
Turn it off completely.

Changing Google Chrome's cache folder

Changing Chrome's cache folder to your RAM-disk or someplace else might speed up your browsing quite a bit. Keeping it off a spinning disk will dramatically improve your access time. I suggest not putting this on an SSD, because of wear and tear. Caching trashes the filesystem a lot.

  1. Close Chrome and locate your shortcut to Chrome. Optionally, locate the Chrome.exe file itself, and create a shortcut.
  2. Right-click the shortcut, and select 'Properties'.
  3. Go to the 'Shortcut' tab.
  4. In the 'Target' line, there will be something like 'C:\Users\equex\AppData\Local\Google\Chrome\Application\chrome.exe'
  5. Append after that text in double quotes: --disk-cache-dir="your_drive:\your_folder"This will only move your cache files, which is good enough.
  6. If you wanted to move your complete Chrome user-folder, append --disk-user-dir="your_drive:\your_folder", and then copy the contents of the old folder into the new one before you start Chrome again.
  7. Click 'Apply' and start Chrome. To verify, look inside your new folder and observe Chrome creating temporary files.

There's a guide for FireFox here.

Moving Windows temporary folders

Change the Windows temporary folders

This page was just a quick write-up to compliment the SSD/RAM-disk tutorial. To let Windows use a custom location for its temporary files, right-click My Computer and select Properties, then do as follows:


Go to 'Advanced System Settings'


Select 'Environment Variables'


Select 'Edit'


Edit the folder locations. The default locations will be inside the Windows folder.


9/4/13

Portable Apps and USB Utilities

Portable Application Compilations

PortableApps.com, this is a huge collection of smaller apps and games.

WSCC, Windows System Controll Centre, a compilation by NirSoft that includes all NirSoft itilities, as well as a comprehensive wrappe of all the SysInternals utilities.

7/24/13

Three Android smartphone reviews


The three phones in this article:


  1. XCover (GT-S5690). Smallest but thickest. Can be used under water, even. Gingerbread 2.3.3, upgradable to 2.3.6.
  2. S II (GT-I9100) A tiny bit bigger but half the depth. Gingerbread, upgradeable to Ice Cream Sandwich 4.0.2.
  3. Note II (GT-N7105 aka t0lte/t0ltexx). Massive. Jelly Bean 4.1.2, upgradeable to 4.3 at some time in the future. Perhaps even Android 5, they say.

GT-S5690 XCover

This is the XCover 1 and not 2. I have used this phone for 2 years or so, and yes, this phone is solid as a rock. I haven't been able to even scratch it, and it's still good as new.

The XCover is a so called 'rough', or 'active' phone, seriously modified but crippled to work in most environments. Mine has updated from 2.3.3 to 2.3.6 and has a total of 316MB RAM available, but the system takes some of that. A single-core 1.2 Ghz undeclocked to 800 MHz processor and a low density screen. It  has a system storage area of 165 MB, which is what you get to play with.

It's not a bad phone, but the slowness and memory shortage becomes obvious after a few months use. Well, actually it *is* a bad phone, because sometimes it can take 5-30 seconds for it to actually pull up the dialler and make the actual call. Someone needs to make the dialler a prioritized app in case of emergency. Seriously, on a bad day I can spend 30 seconds getting an outgoing call. It's a good entry level phone, and was my first Android.

The 'rough' aspect was what sold me, as I was initially opposed to miniature-sized and crippled computers that broke their screens if you lost them, and also caused you acute permanent squinting eyes-syndrome after staring at those small displays that the first smoarthphones came with.

Coming from a Samsung Solid Extreme B2100 (an ancient feature-phone), this was what I would start with.
Much has changed. Samsung has, at the time of writing, just been ranked the most profitable business in the world, completely obliterating Microsoft and Apple projects. And their phones are solid, Gorilla-Glassed multi-core SoCs that just reeks of high-tech. And most importantly, Samsung devices are open in nature and as such, has the hearts and minds of the geek hordes out there, inevitably making Android rise faster than you can throw a chair out the window.

This phone is easily rooted but has no active development on any custom ROM's. Someone did actually make a custom kernel to unlock 1.2 GHz on the GT-S5690M variant. This phone is obsolete now and replaced with the XCover 2, which will not sell more than the XCover 1, because they improved nothing, except adding a second core. The problem with this phone is the _memory_, Samsung! I have read that when you root it, you can set up a symlink so you can move apps off the main memory to the SD card as well. (In addition to the already moveable apps).

After I got the 7105, I wiped & factory restored it, rooted it and now it\s a backup phone in my always-on backpack. This phone will perhaps be used for a wifi security cam, or integrated with my Arduino boards in some way. It does contain 3G networking and an AM/FM radio, something that 4G devices don't.

Facts: (more over at gsmarena)
  • Gingerbread 2.3.3, TouchWiz UI
  • Dimensions: 4.80 x 2.60 x 0.47 inches (122 x 66 x 12 mm), 136 grams. Corning Gorilla Glass.
  • 3.65 inch TN LCD, 320x480, 160dpi display. VGA video recording.
  • 3.5 mm stereo jack, USB 2.0 micro-USB connector, both covered up.
  • GPS, Flashlight, loudspeaker, FM radio (RDS), with headset as antenna
  • 316 MB RAM, 158 MB usable. Supports microSD, microSDHC up to 32 GB. Uses mini-SIM.
  • Marvell MG2 CPU @ 800Mhz, GC800 GPU,, PXA968 chipset.
  • 3.15 MP single camera. 2048×1536 pixels. Video: 640x480 (VGA) (30 fps)
  • Bluetooth, A2DP, EDR, WiFi (802.11 b/g/n), Wi-Fi hotspot
  • Networks: 2G + 3G: GSM 850 / 900 / 1800 / 1900 and HSDPA 900 / 2100
  • GPRS, Class 12 (4+1/3+2/2+3/1+4 slots), 32 - 48 kbps, EDGE
  • Accelerometer, proximity, compass, magnetic sensor
  • IP67 rated, Water (Water), Dust, Shock proof
  • Battery: 500 mAh Li-ion
Includes:
  • Wall charger. (Not USB-adapter)
  • microUSB cable
  • 2 GB microSD card with SD adapter
Pros:
  • I have used this phone in -35 C winter, +45 C summer, in rain and wind.
  • I have dropped this phone, thrown it in the wall and there's hardly a scratch in the paint.
  • Decent sounding speakers. (Doesn't crackle)
Cons:
  • Way too little memory
  • Small screen

 GT-I9100 S II

Everybody knows the S2, a lethally good phone that are only taken off the market because it's been replaced by S3 and now S4. (which are both ridiculously overpowered and  completely overkill for a phone!). This is a lighter phone and is more rectangular then the S3. I have installed CyanogenMod 9 on this one, and it's just fucking awesome. As the S indicates , it's a flagship model and it's essentially Samsung's Destroyer Of iPhones and need no further introduction, but I just have to mention this phone because after I installed CM9, the battery life on this is just ridiculous. Given, I have actually manually disabled the GSM module, this is just insane. Actually, I think S II with CM9 becomes a free energy unit. It's doubleplus good! It has a dual core ARMv7 and 1GB app mem as well as  8 GB internal memory. Of all my phones, this is the one that brings up the camera the fastest.

Fun Surveillance Fact: When it comes to wether the GSM module is active when the phone is off or not, this is extremely obvious to me now: The 5690 died after a few days, and the S II was still on 97% power after it was in it's 2nd week. The proof is indeed in the pudding and so is the NSA. Myth confirmed. As you all know; when you are on your 3rd straight night and your Google Fu is strong; it is not easy to do dig those links up later, but somewhere on the web is the dialler code for disabling the GSM module. In some tyrant countries, both in the east and the west, this might be a crime, just so you might know. But then againt, there was a time after and before Snowden, Manning & Assange.

Specs:
  • Gingerbread 2.3.4, TouchWiz UI, Upgradable to 4.0.4 and then 4.1
  • Dimensions: 66.1x8.5,116
  • Screen: 4.3 inches, 480 x 800
  • 3.5 mm stereo jack, USB 2.0 micro-USB connector
  • 1024 MB RAM, 8 GB internal storage. Up to 32GB SDHC card.
  • CPU: Exynos, dual-core 1.2 GHz Cortex-A9 (Orion), Mali-400MP GPU.
  • Camera: 8MP (3264x2448) and full 1080p video recording. Secondary camera @ 1.2MP.
  • Wi-Fi 802.11 a/b/g/n, dual-band, DLNA, Wi-Fi Direct, Wi-Fi hotspot, BT v3.0+HS, A-GPS support
  • GPRS: Class 12 (4+1/3+2/2+3/1+4 slots), 32 - 48 kbps, EDGE 2.0. HSDPA, 21 Mbps; HSUPA, 5.76 Mbps
  • No FM radio
  • Battery: 1650 mAh Li-ion


GT-N7105 Note II

This is essentially an S III blown up to half tablet size. This is a so-called 'phablet'. And it's also the first smartphone I've had that I can type on without going insane from hitting 2-4 buttons at the same time. The screen is a fabulous 5.5 inches and it's heavy! Think of this rather as a PDA that can make phone calls, rather than a smartphone. At 1280x720 (and full 1080p over USB) this actually usable as an emergency computer when travelling or just on the toilet. From this I can pretty comfortably use a Terminal Emulator or SSH into my shells or scribble down some ideas. I've installed some compilers, but I haven't gotten to actually develop _on_ the phone yet. The 7105 plugged right into the Eclipse IDE as the 5690 and the 9100 did. I have started development on some (yet not existing!) apps and the 7105 is excellent to develop on, because it has both multi- and single window display mode!

The memory arrangement is a bit different than usual; both the internal memory and application memory are merged. And then it has only 'device storage'. This means that you cannot move apps to SD card as usual. Such it has a comfortable 8 GB app memory in addition to the 8 GB microSD card. However, I suspect this can be fixed if you root it and set up a symlink, like has been done for the S5690.

It comes with stock 4.1.2, and has some nice Note-specific apps. It does of course come with a stylus pen. This will enable extra UI features, as you can use the phone from an inch's distance. The stylus has a (non-obvious) button that acts as if you actually pressed against the screen. It has a nice AMOLED display and works reasonably well outside in the sun. It has an 8 MP main camera and a 1.3 MP front side camera. Be aware that it needs a mirco-SIM card. You 'regular' SIM card will not fit.

Yeah, about the front side camera. It sees you. It stalks you. It knows. It will rotate the screen to match your face. It will adjust the intensity level of the screen depending on ambient light, if you wish.  It will tell you the time if you try to reach for it. I shit you not. You can also talk to this phone, it will even start beeping if you walk away from the stylus pen. Creepy stuff. But at least I have it enclosed in a book-cover. This is the precursor to the Trapperkeeper 9000!

The 7105 has a CM for it, but it's not stable, and only provides experimental and nightly builds. At this moment, several of the last 14 builds would not boot.

Specs: (more info here)
  • JellyBean 4.1.2. Will be upgradable to 4.3.
  • Dimensions: 151.1 x 80.5 x 9.4 mm
  • 720 x 1280 pixels, 5.5 inches
  • 3.5 mm stereo jack, USB 2.0 micro-USB connector
  • 2048 MB RAM, 8 GB internal storage. Up to 32 GB SDHC card.
  • CPU: Exynos, quad-core 1.6 GHz Cortex-A9 (Orion), Mali-400MP GPU.
  • Camera: 8MP (3264x2448) and full 1080p video recording. Secondary camera @ 2.0MP.
  • Wi-Fi 802.11 a/b/g/n, dual-band, DLNA, Wi-Fi Direct, Wi-Fi hotspot,  A-GPS support and GLONASS
  • BT v4.0 with A2DP, LE, EDR
  • GPRS: , EDGE 2.0. HSDPA, 21 Mbps; HSUPA, 5.76 Mbps; LTE, Cat3, 50 Mbps UL, 100 Mbps DL
  • No FM radio. Accelerometer, gyro, proximity, compass, barometer
  • Battery: 1650 mAh Li-ion

Epilog


Rumors has it that the S3 and the Note 2 will skip 4.2.2 and jump straight to 4.3. That is a shame, because there are several bugs in the 4.1.2 interface, most annoying is the fact that apps deleted from folders on the home screens won't always clean up the slot it had in the folder and the space remains empty and no amount of tinkering will make it right again. There are some others I've noticed too, like the background picture mysteriously disappears sometimes, only to come back after going in to the app list and back. The good news is that our devices has been chosen as the only two to actually receive 4.3. Some say even 5.0. For all your questions about rooting, and modding and the tools of the trade, refer to http://forum.xda-developers.com/ f.

A friendly warning: Do not use so-called M2 memory with Samsung phones. It's for Ericsson phones. They will die after a certain time. My wife and I got our 8 GB cards on the same day and they stopped working on the same day after a year or so! They were not rescuable. So, if you card has the letters M2 anywhere on the card itself, it is an M2 card!

Updates:


Update, July 25th 18:52

Here's some more useful links that you might want to visit after reading this.

GT-S5690 files:

GT-I9100 files for changing kernel, checking FLASH, rooting and installing CM9:

GT-N7105 threads:

Generally, our friendly superhero chainfire has developed root techniques for several Android models. Check this site out.

5/9/13

Bitcoin mining and profitability

[Updated 22/05/2013]
[Updated 24/05/2013]
[Updated 04/06/2013]

To mine Bitcoins, be sure you do your calculations first. I can only tell you my own estimates. But here I go:

What cards to mine with?

You need AMD cards. Short and simple.

Almost any AMD mid-high end card will be profitable, and the more the better.
Nvidia cards only deliver about a third to about a half of what an AMD card can do for these kinds of operations.

This is not due to bad manufacturing from Nvidia's side. This is due to the architechture differences, and can not be used against Nvidia, because these cards are primarily gaming and workstation cards and infact my GTX660 outperform my Crossfire'd dual 6790 cards.

GPU's are simply meant to render games and not do cryptography. Also, AMD has chosen a more-cores-is-better strategy, while Nvidia chose the fewer-but-higher-powered-cores strategy.

Power draw

Here is some raw data:


As you can see, the MHash/watt column speaks for itself. The 8800 GT card that many like to mine with is barey any help at all. Same with the GTX660, although it performs better per watt.

The winner is the Sapphire-produced 6790 cards, which are basically two 6770 cards baked into one. This is in truth a 4x6770 rig, but divided into 2x6790-branded monsters.

The low-end 6450 cards have the best ratio, but they simply don't produce nearly as much BTC as the other cards. They are more economic though, and also very quiet.

Based on calculations on bit, (well, I stole this formula: 0.56 USD/24h@100MHash/s), and accounting for two things, I realized how I can profit:

To mine or not to mine

If my Nvidia-based desktop is on _anyway_, then mining with Nvidia cards are _barely_ profitable. But in no way does it pay to have an Nvidia-based rig on for the sake of mining, that will negate any profit, unless you do not pay for power.

However, with AMD-based rigs, having then on 24/7 for the sake of will actually pay off. Not much in my case, but some. Currently, after 3 days of much interrupted mining, I have earned $3.236, but the next few days should go smoother. Some rigs cannot run at 100% capacity all day due to noise, but I'll post some more values later.

Pooling

Of course, mining alone makes no sense. I have joined up with slush's pool and have engaged about 9 worker GPU's, at tines reaching almost 0.5GigaHash (500Mhash). Now I have a rate of about 700Mh and I am expecting an 6850 and a 4850x2 in the mail anytime now. That would probably boost me to a close 2GH. >D

CPU mining

Also, CPU mining is not worth it at all either. A Phenom X6 1100T @3.7Ghz mines about 10M/hash for about 20 Watts, so that's a no-deal.

The hard numbers and tools you need

You will need to install a so called Wallet. This is a cryptographic file that contains the data needed to store your money. Personally I am using Multibit, because it's just a bit faster to sync up.

Set up your account at the pool, I am using Slush's Pool.

You can find guiminer here. This is the easiest tool for beginners. It defaults to OpenCL renderers but you can install any mining backend.


GPU-Z - Monitor your GPU

Sapphire TRIXX - tweak your Sapphire cards

CUDA addon for guiminer, slightly increase Mh.

Optimized CGminer addon for guiminer

Mining proxy - And other tools, keep your local miners banging one internal server than your pool operator. Slight Mh increase.

Exchange rate webservice Will give you an API token to put into guiminer so you can get more currency conversions.

What is Namecoin?
Merged mining with Namecoin:
Info
Help page here
Register a .bit NameCoin domain. (Can be synergized with BitCoin at Slush's Pool)

My current Bitcoin address is 1Fk5kGvhTPhzmgUDU8dDugB5LF122DExLY
My current Namecoin address is MyUxMoHueS1UyUrJMYUivDAfdCaquY21MR

Feel free to try to send me some coins!

Some flags to pass to guiminer:

-v (vector mode) Doesn't accept parameters in guiminer.

-w128 (worker threads)

-f60 to -f200 Desired desktop framerate, used to make sure other apps recieve proper FPS.
OR
-s0.015 Delay each frame by this much, used to nerf capacity to reduce noise and temp.

Play around with these values to see what works best. Usually I keep one CPU core per GPU card. The 6870 actually required 2 cores to gobble enough data to fill its 1120 cores.

Some examples of what some hardware will perform:

  • AMD cards

  • Sapphire Radeon 6450 (Caicos, 160 x Stream Processors)
    Standard business-class word processing card, but does a good 30Mh.
  • AMD Radeon 6490M (Lamo)
    30Mh. This is the 'office' desktop piece of an AMD A6 3410MX APU based laptop. I has the following chips:
  • AMD Radeon HD 6520G
    The laptop switches to this for high-performance needs, like gaming. (And mining!)
  • Sapphire Radeon 6790 (Bart, 800 cores)
    180Mh out of the box, but they can do up to 196. My two 6790's are also in my wives' gaming PC and so I set them up with -f200 so she can play without notiching lag.

  • XFX Sapphire Radeon 7750 (Cape Verde Pro, 512 cores)
    Noiseless! Also, only requires 50 watts and no PCIe power cables either. 126Mh [-v -w 128 -f0].
  • Gigabyte Radeon 7750 (Cape Verde, 512 cores) ~ 120Mh [-v -w 128 -f0]
  • XFX Radeon 6870 (Bart, 1120 cores) NEW!
    Does 266Mh [-v -w256 -f100]  but with -w256, memory clocked to 340 and overclocked to 900 it did 296.6.
  • ATI Radeon 4850x2 NEW!
    250 watts.
  • Nvidia cards

  • Gigabyte GeForce GTX660 2GB (GK106, 960 cores)
    Does 70Mh [-v -w256 -f60, but wih rpcminer-mod-cuda.exe I tweaked 81.8 out of this.
  • PNY GeForce 8800GT 512 ~ 30Mh
  •  CPU Mining (regular guiminer)

1100T @ 3700MHz ~ 10Mh
960T @ 3400Mhz ~ 7Mh
Intel i5 @2900Mhz ~5Mh

Some more cards I got just for this project:

Sapphire Radeon 6870:
This card is awesome and delivers just short of 300Mh.. The 6870 has 1200 cores and are really just a rebranded 5870 - a true AMD masterpiece. Here's some stats:


As you can see, this run was made using a local proxy against slush's pool on a gigabit network. Also, all these cards promptly puts our motherboards into PCIe 8X mode. This is expected and will probably affect the total bandwidth by a few percent. I might do a single card test to see if 8X or 16X is any different.

ATI (yeah) Radeon 4850x2:
A massive beast, longer than the 6870 and draws even more power. I was struggling with the power cables so this card is untested still, but this will be interesting. Unfortunately, it seems to have been assembled in a way that makes the PCB curve i bit and it looks a bit unsettling.

Do's and dont's:

ALL gambling will set you back very quickly.
SOME free BTC faucets with captcha solvers are often a scam
DO NOT mine with a CPU
DO use a pool
DON'T mine if you aren't ready for micromanaging lots of infrastructure. Buy and sell trough regular exchanges instead.

Does this sound too complicated ? Hire me to set up a Bitcoin farm

Final thoughts

Also, to finetune your setup, you can overclock the core speeds and underclock the memory speeds.This will save you watts as well as reduce GPU wear and tear. Install your overclock and tweak tools and see how much you can reduce power draw without sacrificing too much speed.

So invest in some extra quiet fans and place your rig close to a ventilation hole to dissipate some heat. Ofcourse, as a Norwegian resident, this is just a replacement for other heater installations during the winter! During summer, power is cheap but produces a lot of heat.

Be warned that GPU's at full workload will heat some cards really well. My 8800GT was over 100C!

My two mining rigs are just a few Mh off a Gigahash/sec for about 800-900 watts of PSU and did during the test period mine just above half a Bitcoin with MANY interrupts. Daily payout: about $4 with threshold at 0.3. Probably tweakable to 5-6. (Also gaines 0.05NMC co-mining with slush, using Acrylic DNS and OpenDNS. Pretty sweet setup!)

I tried BFGminer also, which is really sweet, but I had trouble with the temperature variables. Also the 64 bit version did not work under my setup. Only the 32bit one.


5/3/13

USB3.0 vs USB.2.0

[Updated Aug. 26 2013]

I had bought a new Seagate 2TB USB3.0 disk and gave it a spin. Here's some results that I wrote at the time; and some updates.

This was done on the Gigabyte FX990-UD7 mainboard which has an Eltron USB3.0 controller and I have it set up with two 250GB 3Gbit SATA2 disks on the Marvell RAID controller on the board, and an Intel 80 GB SSD disk.

USB2.0 is mostly limited to around 20-25MB second, depending on your controller. Remember, if you want network speeds over 10MB/sec you will have want to upgrade to a Gigabit home network. Then you can achieve speeds around 100 MB/sec.

So, it would be pretty clear that the days of 100 MBit networks are over. To accommodate these now ubiqous technologies as RAID, SSD and USB3, I expect gigabit switches to sell good the coming year.

Update:

Added one Kingston 120 GB SSD SATA3.0 drive.
From the USB3.0 to the new SATA3.0, I achieved around 310 MB per second accoring to the Resource Monitor, but the file dialog claimed substantially less.

One of the reasons I had to get the new SSD was ofcourse that the 3 year old 80 GB Intel drive was full, as it is the main system drive, so I have had no SSD to actually put stuff I use. The first thing I did was to move everything Java-related onto the new disk: JRE, JDK, Eclipse and the Android SDK. I noticed an immidiate 2x speedup, and before this, the software was located on the RAID0 drive in this test'

Also 'added' was a 4 GB ' AMD Radeon RAM disk'. This disk is used for Chrome and Windows temporary files. The disk is loaded very early in the boot sequence, and can probably host more interesting things.

Using a single test file of ~4 GB, except for when testing the 4 GB RAM disk, I used a 2.3 GB file.
These values are the observed max values under the Windows transfer dialog.

RAID0 2x3Gbit to USB3: 150MB/sec
USB to RAID0 2x3Gbit: 190MB/sec
SSD SATA2 to USB3: 180MB/sec
USB3 to SSD SATA2: 190MB/sec
SSD SATA2 to RAID0 2x3Gbit: 225MB/sec
RAID0 2x3Gbit to SSD SATA2: 135MB/sec


USB3 to SSD SATA3: 210MB/sec
SSD SATA3 to USB3: 215MB/sec
SSD SATA3 to SSD SATA 2: 266MB/sec
SSD SATA2 to SSD SATA 3: 180MB/sec
SSD SATA3 to RAMDISK: 506MB/sec <--- font="">
SSD SATA2 to RAMDISK: 220MB/sec

The Kingston SSD packaging claimed max 450 read speed, so caching probably caused those 506 :)

1/26/13

Ultraviolet LED's

So I got a pack of Sparkfun LED's and some UV LED's on the side. A little investigation led to the conclusion that the separate LED's are rather superflous. It turns out the 'violet' LED's in the Sparkfun pack have the exact same wavelength as the LED's sold separately.

They are both of the class called 'UVA' which goes from 400 – 315 nm. The separate LED's do however seem to be a bit brigther. Also the construction itself of the two differ a tiny bit - we are talking sub-millimetre and fractions of degrees.

Here's a table of UV wavelengths, ripped right out of Wikipedia.
UltravioletUV400 – 100 nm3.10 – 12.4 eV
Ultraviolet AUVA400 – 315 nm3.10 – 3.94 eVlong wave, black light
Ultraviolet BUVB315 – 280 nm3.94 – 4.43 eVmedium wave
Ultraviolet CUVC280 – 100 nm4.43 – 12.4 eVshort wave, germicidal
Near UltravioletNUV400 – 300 nm3.10 – 4.13 eVvisible to birds, insects and fish
Middle UltravioletMUV300 – 200 nm4.13 – 6.20 eV
Far UltravioletFUV200 – 122 nm6.20 – 10.16 eV
Hydrogen Lyman-alphaH Lyman-α122 – 121 nm10.16– 10.25 eV
Extreme UltravioletEUV121 – 10 nm10.25 – 124 eV
Vacuum UltravioletVUV200 – 10 nm6.20 – 124 eV

Using a TV remote to control an Arduino

I had bought a couple of pairs of these IR emitters/receivers and wondered if the wavelength of the light would be the same as for standard IR remote controllers for TV sets.

So instead of trying to hook up the emitters, I went straight for the TV remote. I had two available; one universal remote and one Panasonic DVD/TV remote.

The red one is the LTR301 (reciever) and the yellow one is the emitter. (LTR302).

Using IRremote.h, I was able to collect the raw IR codes from the remote control. This required me to remove the file Tone.cpp from the Arduino IDE's /cores folder. The reason for this was that IRremote.h library was implementing the same interrupt handlers. I am not using the tone generation functions in this library, so I just moved it outside the root folder and then IRremote.h would compile eventually :)

Having no use for the actual functions of the remote, I don't bother to translate them. I just made a lookup-table of what to do for each code, and drew out a sketch on paper what button produces what code. An obvious use of some buttons, like the 'center joystick-like pad', usually consisting of four identical left-right and up-down buttons for channel and volume, respectively, was ideal for forward-backward and turning control.

I hooked the IR sensor up with a 10k resistor, this gave me a detection range of about 50cm, straight angeled on the side of the sensor. Not very practical for a remote controlled device, but some modificationm of this could extend the range.

On the other hand, I do have the both the IO shield and the Mega ADK and a spare Android phone, so this could be controlled over BlueTooth or Wifi too. This could be a low level fail-safe input channel, in case the robot has to be shut down at a moments notice, regardless of the potential fickles of BT and WiFi reliability on an Arduino system.

1/11/13

Rover 5 Robot soon ready

So there's been a while since last post.

Huge improvements has been done. The robot is essentially operational. This is what what I have done so far: This robot seems fairly similar to Mr. Explorer, actually.


  1. Rover 5 (4 motor/encoders, the ROV5.3 model) 
  2. DFrobot Robot Base Plate mounted on 50mm standoffs. 9V
  3. Dagu 4 channel motor controller mounted upside-down on 250mm standoffs, right under the pan servo.
  4. Metal framework mostly made of Hoist/Metal Element metal pieces.
  5. Arduino Mega ADK mounted with baseplate and mini breadboard, vertically 9v.
  6. Arduino Ubo R3 mounted with HME parts, including mini breadboard, vertically. 9v.
  7. DFrobot Pan/Tilt Kit  but with extra long U bracket
  8. Maxbotix LV+EZ1 Ultra Sonar (Running on high power 4.5v battery, measured to 4.9 volts)
  9. Dagu/AREXX IR Compound eye. 5v
  10. 8 and 9 mounted on tilt servo with HME parts.
  11. IR detector, using an old PanasonicTV remote to communicate with the detector
  12. Piezo buzzer, photoresitor, 2x LM35 temp sensor, humidity sensor, dewpoint sensor, 2x IR sensors
  13. 4-keys on breadboard for core functions
  14. Sparkfun LCD 09531 128x64 LCD (Running on separate 9V)
  15. Custom 2-tier OS, codenamed 'Defiance', with multitasking and will communicate with you trough LCD and a buzzer. User input is the 4 keys and a TV remote.
  16. Diffused tricolor LED for system status indication.
  17. Mega and Uno communicates vie RX-TX and RX1-TX1. (Still working on that.)
  18. TODO: Hook up my S2 running CM9 and utilize BlueTooth, WiFi and of course its excellent array of sensors, the 1080p camera and the sheer power of a quad core ARM to do the heavy CPU stuff!
Now all code is tested, all components are running separately and the work ahead now is just to tie it together with some neat AI, as well as tidy up the code, gather some more credits (yes i blatantly stole some code here and there).

My primary concern now is to figure out a mechanism that will kill the 4 motor power source in case the 5V controller supply should die. (this situation is not good)

My other problem is that the one of the robot chassis tracks will derail once in a while. I am working on a remedy including weight distribution and tape. I will at the end of this produce a how-to on this whole endeavour.

Here's some pictures of the process and a link to a video that shows the motors working.

The first version of cabling between the motor controller and  a breadboard.
Although it would probably work, I decided to use regular F7F cables instead.

Mounting the LCD. This was not actually a good location, so  it was removed.

First incarnation of the robot.


A later version; with LCD on the back

The other side.

I ended up butting the base plate sideways to recuce overall height

The Uno drives, the motors, the sonar and the IR. It signals the Mega if anything interesting is happening.

The whole thing can be loosened with 4 screws so I can access the motor controller and the battery pack.
 Video:

  http://www.youtube.com/watch?v=RhAFjcacjHo&list=UUb4_Uft1J4XmXQXZqHPF8AA&index=1


1/2/13

DFRobot capacitor packs

Just to have this at a place I know, here's the shipping list for a 250-pack of capacitors from DFRobot. (it's not 220, it's 250!). The markings on the bags and the caps themselves was a bit washed out, but this list pretty much clears up any doubts:

  • 1pf  (10 units)
  • 5pf (10 units)
  • 6pf (10 units) 
  • 10pf (10 units) 
  • 15pf (10 units) 
  • 20pf (10 units) 
  • 22pf (10 units) 
  • 30pf (10 units) 
  • 33pf (10 units) 
  • 47pf (10 units) 
  • 68pf (10 units) 
  • 100pf -101 (10 units)
  • 220pf -221(10 units)  
  • 330pf -331(10 units)  
  • 470pf -471(10 units)
  • 680pf -681(10 units)
  • 1000pf-102 (10 units)
  • 2200pf-222 (10 units)
  • 3300pf-332 (10 units)
  • 4700pf-472(10 units)
  • 10000pf=10nf-103 (10 units)
  • 22000pf=22nf-223 (10 units)
  • 33000pf=33nf-333 (10 units)
  • 47000pf=47nf-473 (10 units)
  • 100000pf=100nf-104 (10 units)