About

9/16/13

Torchlight II Robot Parts Locations

While playing Torchlight II, it can be difficult to complete one side quest: Robot Parts. It may seem a minor quest, but in fact it's the longest quest of the game, spanning over almost the entire game. The Robot is made up of 5 different parts, all located in 5 different areas/quests. When you've collected all the robot parts, a bot shows up, named Trillbot, who will send you on a final Robot quest: to kill the Three Sisters. Once you've done that, go back to Trillbot to collect your Unique Item reward. It's usually always something useful.
Here you will learn where all the Robot Parts are located, so you can collect them all.

Part 1 - Robotic Drum
Quest: Little Lost Ones

  • Take Crow's Pass to The Widow's Veil
  • The Drum will be at either Location A or B
Location A
Location B
Robotic Drum Part

Part 2 - Robotic Arm
Quest: Tower of the Moon

  • In the Ossean Wastes, locate the Tower of the Moon 


Part 3 - Robotic Pipes
Quest: Shadow of the Skara

  • In the Salt Barrens, locate Swarm Point, then locate the Brood Hives (after hitting all the plungers)


Part 4 - Robotic Body
Quest: The Cave-In

  • In The Blightbogs, locate The Abandoned Sawmill
See the little skeleton hanging on the post ?
Click him and all like him to access the robotic body.


Part 5 - Robotic Head
Quest: Cacklespit's Realm

  • In the Sundered Battlefield, locate Cacklespit's Realm
The wood and stones come together to form a path as you approach it.
It spawns in a different place every time.

Part 6 - Assemble Robot, talk to it
Quest: Three Sisters

  • Wait until the Big Robot beside Professor Stoker goes through the door, then talk to Stoker again.
  • Then, talk to Trillbot, next to Professor Stoker
  • In the Sundered Battlefield, locate 3 Sisters

After you kill the three sister, return to Trillbot for unique item reward.


9/5/13

Optimizing your system with a RAM disk and SSD

RAM and SSD disks, how to use them?

Installing an SSD disk in your system is probably the best thing you can do to upgrade your PC, except for installing more memory into a system with rather little of it.

If you have 8 or more gigabytes of memory or more; adding a RAM disk to your system can increase performance quite a lot, as well as decreasing the wear and tear on your SSD(s) and other drives.

In addition to the raw speed of the SSD it self, the RAM disk boosts you another 200-300 megabytes per second, on top of the SSD speedup if you configure Windows and other cache-heavy appsto host it's temporary files on your RAM disk.

Host the RAM-disk image on the SSD for optimal speed when loading and saving the RAM disk on system restart. The RAM disk loads very early in the boot sequence so any apps depending on your file structure on the RAM disk will not have any problems starting up or shutting down.

My setup:

  • 80 GB Intel 320 Series - With Windows 7 x64 installed. User directory not moved.
  • 120 GB Kingston SV300 Series - Installed 2 years after
  • The free version of AMD Radeon RAM Disk. (4 GB limit). This RAM disk is loaded and saved to the second SSD on each boot and shutdown.
  • System memory is a comfy 4x4 GB DDR3 at 1600 MHz, so 16 gigabytes of RAM.
  • A Lexar USB 3.0 stick. Doesn't perform any better than USB1.0! Shame on Lexar!
  • 160 and 320 gigabyte SATA 2.0 disks. These are used for non-system critical applications, like painting and music programs
  • Two 500 GB Hitachi SATA 2.0 disks, 5 Gbps in RAID 0 configuration on onboard Marvell controller. This RAID was my earlier 'fast' drive.

Checklist:

Steps to take assuming you have a pretty full primary SSD, a second SSD to use, and a RAM disk:
The Java control panel shows you where it loads the JRE or JDK from.

Other Programs

This is programs where I have confirmed that you can configure custom paths for one thing or another.
 I will grow a list here of apps that you can re-configure:
  1. WinMerge - Difff temp folders
  2. PSPad - Backup files directory
  3. uTorrent - Torrent files.
  4. VLC - Encoder temporary files
  5. Locate32 - The database file 'files.dbs' database can be moved.
  6. ImgBurn - Log, project files, misc.
  7. SeaMonkey - Cache
  8. 7-Zip - Temp folder
  9. Putty - Log files
  10. GIMP - Temp files
  11. WinRAR - Temp files, also for non-removable drives
  12. Audacity - Temp files

Changing or turning off your Windows swap/page file

You can turn off, move or resize the computer's virtual memory file , aka swap file, aka page file.
If you have enough memory, like me with my 16 GB, you can most often turn it off and never miss it.
This will be a considerable speedup from having your page-file on a regular spinning disk. But, me being a power-user and developer, I have so much going on that the system eventually runs out.

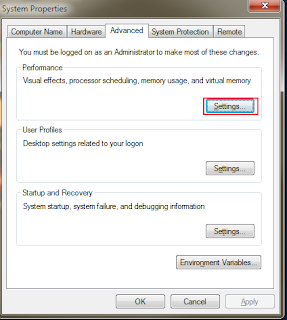
My Computer->Properties and select Settings

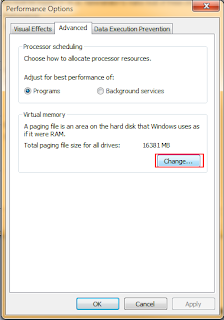
Select 'Advanced' tab and then 'Change'

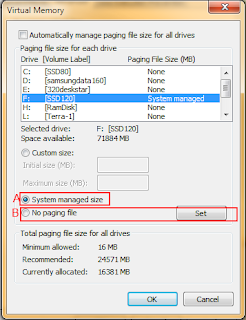
Select the drive you want to edit the page file settings for.
As you can see, you can set it to a custom size or:
Let it be system managed.
Turn it off completely.

Changing Google Chrome's cache folder

Changing Chrome's cache folder to your RAM-disk or someplace else might speed up your browsing quite a bit. Keeping it off a spinning disk will dramatically improve your access time. I suggest not putting this on an SSD, because of wear and tear. Caching trashes the filesystem a lot.

  1. Close Chrome and locate your shortcut to Chrome. Optionally, locate the Chrome.exe file itself, and create a shortcut.
  2. Right-click the shortcut, and select 'Properties'.
  3. Go to the 'Shortcut' tab.
  4. In the 'Target' line, there will be something like 'C:\Users\equex\AppData\Local\Google\Chrome\Application\chrome.exe'
  5. Append after that text in double quotes: --disk-cache-dir="your_drive:\your_folder"This will only move your cache files, which is good enough.
  6. If you wanted to move your complete Chrome user-folder, append --disk-user-dir="your_drive:\your_folder", and then copy the contents of the old folder into the new one before you start Chrome again.
  7. Click 'Apply' and start Chrome. To verify, look inside your new folder and observe Chrome creating temporary files.

There's a guide for FireFox here.

Moving Windows temporary folders

Change the Windows temporary folders

This page was just a quick write-up to compliment the SSD/RAM-disk tutorial. To let Windows use a custom location for its temporary files, right-click My Computer and select Properties, then do as follows:


Go to 'Advanced System Settings'


Select 'Environment Variables'


Select 'Edit'


Edit the folder locations. The default locations will be inside the Windows folder.


9/4/13

Portable Apps and USB Utilities

Portable Application Compilations

PortableApps.com, this is a huge collection of smaller apps and games.

WSCC, Windows System Controll Centre, a compilation by NirSoft that includes all NirSoft itilities, as well as a comprehensive wrappe of all the SysInternals utilities.